If you haven’t caught this yet, I am a huge fan of ThousandEyes! I was working on a project where we were planning to deploy ThousandEyes agents to hundreds of sites, and to keep costs down we were going to use the Raspberry Pi 4 Model B. Having to image hundreds of SD cards was going to be a nightmare, so I wanted to automate the ThousandEyes Raspberry Pi agent image customization process to simplify the deployment.
Full disclosure: I started this project just as the supply chain issues were hitting the Pi market, and I left that job a few months later. I was never able to run this at scale, but I was able to use this for the few units I was able to get my hands on.
I used a Raspberry Pi as the system for building the images. I found it makes the process much easier, but this isn’t a hard requirement. The main thing is you will need to be able to mount a Linux file system, and it seemed to work much better using a native Ubuntu instance instead of trying to map an SD card to a VM or WSL instance.
Using your preferred tool, flash the Ubuntu image onto one of the microSD cards – these are both good options:
Boot a Pi using the newly flashed Ubuntu image and complete the setup
Automated and Manual Processes
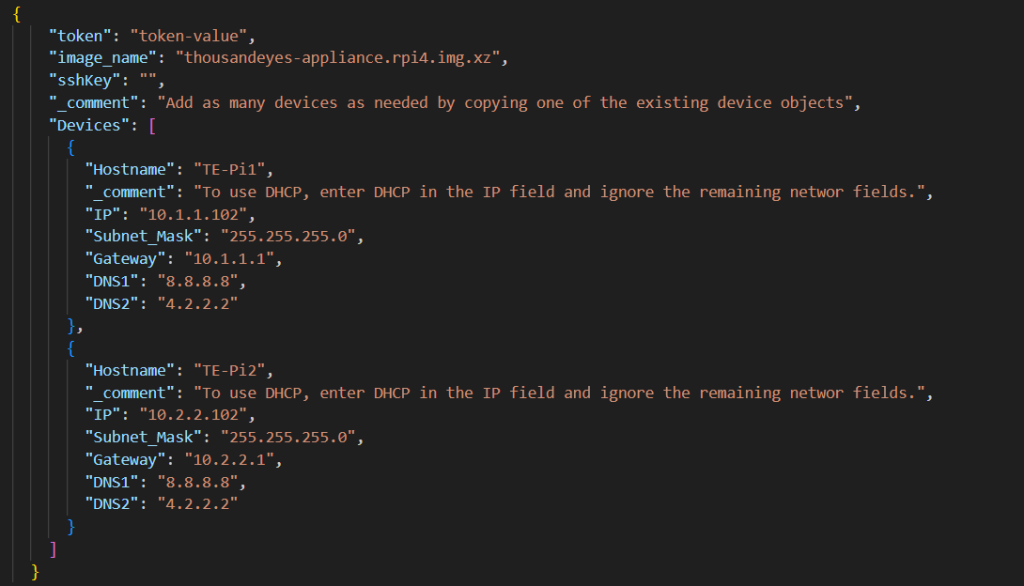
I have an automated process available at my GitHub page: https://github.com/mytechgnome/TE-Imaging The automation uses a JSON file with the device-specific information. You could automate the process of filling out the hostname and IP info if you have that info in an IPAM or similar platform.
How to use the vars.json file:
Token Value – Group token from ThousandEyes portal
Image name – Shouldn’t need to do anything with this, unless ThousandEyes changes the image file name
SSH key – Leave blank if you aren’t adding a key, otherwise paste in the contents of the public key file
Devices – Duplicate the device objects as needed
Hostname – The name of the specific agent
IP – Assign static IP or for DHCP, leave it blank- “”
Subnet mask and gateway – self explanatory
DNS – Also self explanatory. If you’re only using one DNS server, leave DNS2 blank- “”
Below is the manual process. The overall process is the same as the automated script, but with less automated goodness. If you want to understand how the automated process works, you can read through the manual process to get a better understanding.
Mount the ThousandEyes image
Before we can customize the image we need to mount it. Run the following steps from a terminal on the imaging Pi created previously.
Download the ThousandEyes image wget https://app.thousandeyes.com/install/downloads/appliance/thousandeyes-appliance.rpi4.img.xz
Decompress the image unxz -k thousandeyes-appliance.rpi4.img.xz
Create a mount directory mkdir /tmp/temount
Mount the image sudo mount -o loop,offset=269484032 thousandeyes-appliance.rpi4.img /tmp/temount
Note: Because there are two partitions, we need to mount the second partition
If this doesn’t work it could be caused by a change in the partition layout, use these steps to get the correct offset fdisk -l thousandeyes-appliance.rpi4.img
Here’s an example output: Disk thousandeyes-appliance.rpi4.img: 4.07 GiB, 4367262720 bytes, 8529810 sectors Units: sectors of 1 * 512 = 512 bytes Sector size (logical/physical): 512 bytes / 512 bytes I/O size (minimum/optimal): 512 bytes / 512 bytes Disklabel type: dos Disk identifier: 0x354db354
Device Boot Start End Sectors Size Id Type thousandeyes-appliance.rpi4.img1 * 2048 526335 524288 256M c W95 FAT32 (LBA) thousandeyes-appliance.rpi4.img2 526336 8529809 8003474 3.8G 83 Linux
Multiply the sector size (512) by the start block (526336) and use that value in the offset.
Verify the image mounted ls /tmp/temount/
There should be several folders listed. If not, check the offset mentioned in step 4.
Customize the image
There are three files that need to be modified to get the image ready.
Apply the ThousandEyes Account Token sudo sed -i 's/<account-token>/$TOKEN/g' /tmp/temount/etc/te-agent.cfg
Click the eye button to show the token, or the copy button to store it on the clipboard
Set the hostname sudo sed -i 's/tepi/$HOSTNAME/g' /tmp/temount/etc/hostname
Replace $HOSTNAME with your desired hostname
Configure a static IP (Optional – by default the appliance will use DHCP) sudo sed -i 's/dhcp/static/g' /tmp/temount/etc/network/interfaces sudo echo address $IP >> /tmp/temount/etc/network/interfaces sudo echo netmask $MASK >> /tmp/temount/etc/network/interfaces sudo echo broadcast $BROADCAST >> /tmp/temount/etc/network/interfaces sudo echo gateway $GW >> /tmp/temount/etc/network/interfaces sudo sed -i 's/#DNS=/DNS= $DNS/g' /tmp/temount/etc/systemd/resolved.conf
These values will need to be updated accordingly: $IP $MASK $BROADCAST $GW $DNS
A second DNS server can be added by simply adding both addresses with a space between them
Add an SSH key (Optional) sudo echo $SSH >> /tmp/temount/etc/ssh/keys/thousandeyes/authorized_keys
You can generate an SSH key with the following command: ssh-keygen -b 2048 -t rsa
Copy the contents of the key file and put it in place of $SSH
Unmount the image sudo umount /tmp/temount
Flash the image to a microSD card
This is the easiest part, but also the most time consuming. After plugging in the SD card, find the device path for it by running this:
sudo fdisk -l | grep sd
If the SD card is already has partitions on it the output will show each partition, so if you see /dev/sda1 and /dev/sda2 that’s showing the partitions. The image file contains its own partitions, so it needs to be written directly to the card, not into an existing partition. To do that just ignore the numbers shown, so the destination would be /dev/sda.
To start writing the SD card run this command with the correct destination location.
Make sure the correct destination is selected, otherwise you might overwrite something you don’t want to lose. It usually takes about 10 minutes to write the SD card. When it’s finished, try booting a Pi using the SD card and it should come up with the correct hostname, IP, and account token.
All set!
After booting the Pi you’ll want to log in and change the local admin username and password
Default username: admin Default password: welcome
After that, you can double check the setup wizard to make sure everything is good to go. The ThousandEyes agent will reach out to their registration servers and it will use the account token to get assigned to your account. The agent should be online in the portal within a few minutes.
BONUS Fun!
I’m not going to go through all the possible code examples of what you can do with this, but I thought I’d throw out a few things to think about.
Make API calls into an IPAM to get the site name and IP info, then populate the vars.json file automatically with that data.
Flip the script – this process builds the site-specific data into the image. Another option would be to use a generic image (still embedding the token and SSH key) and use DHCP addressing. Then, query the ThousandEyes API to find new agents named “tepi” and then remotely update the IP and hostname that way
A unique SSH key can be added to each image by moving the SSH key value under the devices in the vars.json and moving the SSH section of the script under the per device section, along with changing the variable to use the correct location from vars.json.
Similarly, you could also create new, unique SSH keys by including the keygen process in the script. Just make sure you keep a copy of the keys somewhere safe!
That’s it! Overall, the process is pretty easy, and far easier than finding Raspberry Pi 4s in stock anywhere… If you use this process to automate the ThousandEyes Raspberry Pi agent image customization, I’d love to hear how it worked for you and what, if any, changes you made to the process. You can add a comment here,
I was lucky enough to win a trip to Cisco Live this year through the Cisco Insider Advocates program – https://insideradvocates.cisco.com/. The event was amazing and I wanted to share my experience.
The Numbers
In true geek fashion, I thought it’d be fun to share some of my Cisco Live stats.
2,598 miles flown from MSP to LAS and back (yay for direct flights)
6 days (Satuday-Thursday) in Las Vegas
55,000 steps (roughly 27 miles)
3 books signed – CCDE OCG signed by Zig Zsiga, The Art of Network Design signed by Denise Donohue, and DevNet Associate OCG signed by Jason Gooley
30 selfies taken (with too many awesome people to list here!)
1 exam taken
1 exam failed (but I was close and now I know what I need to study)
1 award received – Cisco Advocates Transformation Trailblazer
3 content presentations, a presentation in the Content Corner, a session with Itential at the IP Fabric booth, and an interview with David Bombal
2 MTE sessions – Jason Gooley and John Capobianco
6 ribbons collected
The Event
The event itself was a great time! Plenty (ok, maybe too many) sessions to pick, tons of vendor booths, and more activities than you could shake a stick at.
The first big difference – last year I was a delegate of TFDx, and this year I wasn’t because I’ve crossed over to the dark side. I now work for a vendor, which means to avoid any conflict of interest or bias, I can’t participate as a delegate. However, since I work for a vendor that sponsored Cisco Live, I had the opportunity to hang out at our booth and talk to people.
The Good
The people. That part is absolutely 100% accurate. The people are by far the best part of Cisco Live! This year was even better because I’ve had the opportunity to meet people at the last Cisco Live, as well as meeting more people through the Cisco Insider programs.
I did the CCDE techtorial again this year, and it, again, was an awesome session!
The Bad
I tried to take my own advice this time. I didn’t attend some of the parties, and I was far more selective on the sessions I attended. I tried to focus my time on the things that were the most valuable to me, and that was mainly taking the time to talk to people. There was still a lot of walking, but so it goes.
I wasn’t planning to take an exam this year, but I was able to grab a spot Sunday afternoon, so I went for it. This year the test center was in Mandalay Bay, so at least there wasn’t the 20-minute walk to and from Luxor for the exam.
The Tech
This year I wasn’t blown away with the tech announcements. I will admit, I am extremely interested in the Full Stack Observability platform. I didn’t get a chance to look at it much, but it’s on my radar to dig into as I get time.
New Thoughts from 2023
There are a few things that are new for me this year that I wanted to dig into.
Cisco Insider program
Though I touched on the programs in my last post, the Insider team had a lot of new stuff that happened this year. As I mentioned, I won the trip to Cisco Live through the Insider Advocates program. In addition to the trip, I was surprised to see my picture in the Insiders Rockstar Hall of Fame!
I was also shortlisted for two awards in the Cisco Global Advocates Awards, and I ended up winning the Transformation Trailblazer award! I was interviewed after winning the award, and I participated in a panel interview with David Bombal. For a guy that can talk a lot, I don’t have the words to convey how awesome that was!
Moving past the ego boost, the best part of the Insiders program is the community. Through the Advocates and Champions program I had the opportunity to meet tons of amazing people. If you’re not already part of the community I strongly urge you to join.
Booth Duty
Though I wasn’t officially on booth duty, I did stop by the IP Fabric booth a few times to hang out. Again, the best part of Cisco Live is the conversations, and I was able to have some really interesting conversations with people. I’ve found there are two topics that universally resonate with network engineers – STP issues and MTU issues. Any time I asked people if they’ve had either issue (I know I’ve had my share) I could watch their soul die. Then I’d show the STP topology in IP Fabric, complete with root bridge and blocked ports, and I could watch the souls spring back to life. I’m not trying to make a sales pitch here, though I probably should. This just another example of how important the conversations are.
Recommendations for Future Attendees
Yes – I just copied this entire section from my previous post because it’s still accurate.
Wear good shoes. It’s a lot of walking! I think I calculated something like 30+ miles of walking during the week.
Bring a water bottle and stay hydrated. With all the walking, the Vegas heat, and the overall dryness, it’s easy to get dehydrated. Add in air travel and perhaps some alcohol consumption, and that’s a recipe for disaster. There are plenty of water coolers, but sometimes it was challenging to find one that wasn’t empty. Bring a water bottle, fill it when you can, and make sure to drink enough water.
Now that the basic human needs are covered, on to the actual conference recommendations.
Make time to talk to people. Sessions fill fast, making it feel like you need to register for as many as possible. Don’t fall into that trap. Sign up for the sessions you really want to attend, and then use the open time to talk to people. Most sessions are recorded, but the chance to talk to people isn’t.
Don’t be afraid to talk to someone. See your favorite blogger, podcaster, and beard? Go ahead and say “hi” to me. And if I’m not your favorite, that’s fine. Say “hi” to me, and them too. Did you hear someone ask a question in a session, and it sounded like they might be in a similar position to you? Talk to them. Maybe they’ve solved a problem you’re working on. Maybe you have some advice you could give them.
Don’t focus on the parties. Sure, they can be fun, but after an 8+ hour day of talking and tech sessions, if you need some downtime, take it. Maybe doing back-to-back-to-back 16-hour days for a week is something you can do, and if so, go for it. If not, that’s cool. The parties, swag, and all of that are great, but if you risk burning yourself out, make sure to pace yourself.
Swag is great. Prizes are also great. Neither should be the focus of a trip to Cisco Live. The cost of the conference pass, hotel, and airfare far outweigh the value of the swag. There’s always joking about finding the vendors with the best swag, but really, look for the vendors that can help you. Talk to them. Talk to vendors you’ve never heard of. Maybe they have a product that can solve a problem you have, and you didn’t even know it existed. If it ends up not being a good fit, move on. There are plenty of vendors for a participant to talk to and plenty of participants for vendors to talk to, so if there’s no value, then it’s better for both of you to move on.
If you need approval to make the trip, highlight how Cisco Live is a lot more than sales demos and swag. You have the opportunity to meet a lot of people and learn about what they are doing. The odds are pretty good that you can find people that have solved whatever challenge you might be facing or at least people that could provide useful information.
(New recommendation) Book MTE sessions! I didn’t book any in 2022, and I have realized that was a huge mistake! I booked two sessions with people I’ve followed for years (Jason Gooley and John Capobianco) and I am very happy I did! They are both quite popular, and being able to have them alone in a room for 45 minutes… uh… in a non-creepy way… is fantastic! Again, the people and conversations are the best part of Cisco Live, and being able to get 1-on-1 time with people that you follow is massively beneficial! You can jump straight into whatever topic you want, and there’s no sales presentation. Just a couple geeks chatting about geek stuff.
Any of the above activities between 10pm GMT February 15th and 10pm GMT February 22nd, 2023 will be entered. I’ll randomly select one entry and contact the winner to arrange delivery.
That’s it. Pretty simple.
Shout outs!
First off, I want to thank the Cisco Insider Advocates program! This prize offered is a reward I’d earned through that program, and since I already own over 30 Cisco Press books I thought it’d be great to pass along the opportunity to someone that’s looking to pick up some new skills.
I also have to say thank you to community programs like Cisco Insider Champions, VMware vExpert, Tech Field Day, and so many others. Being part of these communities has been far more benefitial than I’d ever imagined. Through them I’ve had the opportunity to meet some awesome people, and improve myself both professionally and personally.
Last, but certainly not least, is you! The IT community member that’s working to learn new skills. I know I wouldn’t be for the community. I’ve learned a huge amount from blogs, books, videos, forums, etc., and I appreciate anyone that’s actively working to learn and share their knowledge!
The Drawing!
Before announcing the winner, I wanted to provide some transparency in how the winner was selected. I compiled a list of all blog post comments, as well as Twitter and LinkedIn interactions in a spreadsheet. I then used Random.org to generate a randomized set of numbers that were assigned to each entry, similar to a raffle ticket number. Finally, I used Random.org to generate a number from the total range of entries, with the winner being the whoever had the matching number assigned to their entry.
Back in 2020 I was planning to take the CCDE exam, but those plans were derailed by a little thing called a global pandemic. With test centers closed for an unknown period, I decided to wait until things calmed down before I started to really dig into it. Then, in 2021 it was announced that the CCDE was moving to version 3.0. I didn’t want to get end up in a race against the sunset of the v2 exam, which meant waiting until the release of v3. Add in some travel, a new job, and a handful of other events that distracted from my CCDE plan, and here I am, ready to give this another go.
I’m planning to continually add content as I’m learning new things, both as a way to help me remember what I’m covering, and hopefully in a way that might help others that are either working towards the CCDE or just looking to pick up bits of information along the way.
Study Materials
I have a handful of material that I’ll be using for the CCDE prep.
I have heard too many network engineers push back on learning how to automate things because they “don’t want to be a software developer.” There’s a slight problem with that argument, though. You don’t need to be a “software developer” to get into automation. Automation is surprisingly painless, and it can even be fun!
Both games are surprisingly fun to play. You start with some simple resources and need to craft and build your way to greatness. Luckily, you have bots at your disposal that you can train to do pretty much anything. Chop down trees. Collect materials. Craft tools. Build. Autonauts vs. Piratebots adds in attack and defense. The best thing that the bots can do… build more bots!
Bot script
This is an example of a relatively simple script for a bot. It uses a drag-and-drop interface and can learn tasks by recording the player’s character’s actions.
As can be guessed by its name, this bot is a stone miner. To mine stone in both Autonauts games, you need a pick. During a game, hundreds, if not thousands, of units of stone are required. Why mine all of that manually when you can have a bot do it?
This script uses a repeat loop, with a condition of “forever!” meaning the bot will always be running this task.
Inside that first Repeat loop is another Repeat loop, and this one has an exit condition when the bot’s hands are full. When the bot isn’t holding anything, it will perform the action of moving to the Crude Pick Storage location and then the action of removing a pick from storage.
Now that the bot is holding a pick, it exits the repeat loop and moves on to the next step in the script. The next Repeat loop will run continuously until the tool breaks, and the bot’s hands are empty. During this loop, the bot will look for a stone deposit, move to it, and then use the pick to mine the stone.
The final script results in a bot that will mine until its pick breaks, and when that happens, it will get a replacement pick and return to mining. The bot will continue producing stone as long as there are picks in the storage location and open stone deposits.
Of course, the work doesn’t stop with just this one bot. The crafting and storing of picks will require automation. All that stone that was mined will need to be moved to a storage location.
This script could also be improved upon. The bot can move tools to a backpack and retrieve them. The mining location could be tied to a spot indicated by a sign. The script can be saved and then linked to other bots.
As the player progresses through the game, the tasks become far more complex. Each bot has limited memory in its “bot brain,” which limits each script’s length. A difficult task requires efficient scripting or multiple bots doing parts of the script.
Sure, the game doesn’t specifically cover anything about network automation. However, that’s where I think the value is. The best part of this game is how it makes you think of different ways to build out the various tasks. There are several mechanisms beyond the repeat loops that can be used. It shifts from a linear focus for each task to a more systematic approach.
Traditional CLI configuration is linear. Log into a device, move through the different config layers, and apply the config change. Network automation can use that same linear methodology, but the real power of it is when logic is layered on. Using if/then/else statements, while and for loops, variables, functions, etc., can all increase the power of a script significantly.
The beautiful part about network automation is much like a script in Autonauts; it can be improved iteratively. As new techniques are learned, they can be applied to increase the efficiency of the scripts. Those scripts can be reused later or modified to suit changing needs.
This was my first time attending Cisco Live in person, and it was a wild time. In addition to the normal Cisco Live event, I also had the opportunity to participate in a few extra events. I attended the CCDE Techtorial (detailed post on it coming soon), there were several Cisco Champion events, and I was a delegate at Tech Field Day Extra (TFDx) – https://techfieldday.com/event/clus22/
It was a jam-packed week with a ton of walking, countless conversations, and enough information to make my head hurt. I’ve attempted to distill down my thoughts on the event and provide recommendations from a first-timer to future first-timers.
Overview
If you aren’t familiar with Cisco Live, it’s a major IT industry event that Cisco puts on Every year (virtually in 2020 and 2021) and there are versions of it run globally. The US-based event is the largest, but there are also events in Europe and Australia. I attended the event in Las Vegas at the Mandalay Bay Convention Center from June 12th through 16th. Hundreds of breakout sessions are available, covering the entire Cisco solution portfolio. The sessions can be very high-level, explaining the basics of a technology, or very deep and technically focused. People from all over the world attend, and I believe the 2022 attendance was near 15,000.
The Good
1. The people
I can’t say enough about how much of a factor the social side of Cisco Live was. I spent countless hours talking to people outside of sessions. I had the opportunity to meet so many people, made even more special after two years of quarantine. Many of those people were from other countries, and I likely wouldn’t have had the opportunity to meet them otherwise.
Just to name-drop a bit, I had the chance to talk to Cisco giants Peter Jones, and fellow Champions Daren Fulwell, Mark Sibering, Sijbren Beukenkamp, David Peñaloza Seijas, Bill Burnam, Dustin Gabbett, Joe Houghes, Kenny Paula, Robb Boyd… this list could go on by a few dozen more people… plus the people that I was able to hang out with on the TFDx side (many are also Cisco Champions) – Ben Story, Micheline Murphy, Pieter-Jan Nefkens, Jody Lemoine… (huh, that list is all Champions)… Again, the list could go on. I also had the chance to meet people I’d recorded Cisco Champions Radio episodes with, including Jason Gooley, JP Vasseur, Shai Silberman, and Carlos Pereira. I’ve probably not even listed half of the people I should have.
There were definitely moments when I was in awe of the people I was talking to. I have books written by these people on my shelf. I’ve watched their training material. As a professional geek, it was awesome to just be in the same room, let alone actually talking to these people.
I had the chance to talk with a few people about ThousandEyes, and I could discuss how I’ve used it with peers and learn how they are using it. We discussed challenges and how we overcame them. I talked to people about some of the announcements Cisco made and learned from those different perspectives. I listened to questions people asked during sessions; sometimes, it was a question I was wondering myself but hadn’t thought to actually ask it.
The “live” aspect of Cisco Live was massively beneficial. The conversations were far more interesting and engaging than pre-recorded or virtual meetings. The opportunity to sit in one of the lounge areas and talk shop (or talk about anything else) with peers from many different backgrounds was truly awesome.
2. The people (yes, we just did this)
Told you I couldn’t say enough about the people! The Cisco Insider Champs team (Amilee San Jaun, Breana Jordan, Britney McDaniel, Danielle Carter, and Lauren Friedman) did an awesome job getting us access to special sessions and behind-the-scenes access. They truly made the experience better! Much of, if not all, of the above, was made possible because of the Cisco Insider Champions team. I can’t stress enough how much value came out of the community connections, and I am extremely thankful to be part of it.
Shameless plug: If you’re interested in joining the Cisco Insider Champions program (or the Cisco Insider programs -Advocates, User Group, and User Research), you can find more info here: https://www.cisco.com/c/en/us/about/cisco-insider.html#champions The Champions applications are typically available in the October-December timeframe.
If you join either program, please let me know so I can follow you.
3. The techtorial session
The techtorial was a premium session held on Sunday, the day before Cisco Live officially kicked off. It was a 4-hour deep-dive session, and it was amazing! Having that much time really allowed the presenters to go into depth with the material, and there was enough time to have an interactive discussion. Those sessions are also very focused, which means there’s not really a level-setting/marketing part of the session. From a value-per-hour standpoint, I think I got a lot more out of the techtorial than I did the normal sessions.
4. Swag.
I have to mention the swag. Sure, I didn’t get sent home with the thousands of dollars of swag that are given out for the Oscars, but I was happy. A few shirts, socks, and a wide assortment of other random bits. I will say that I’m disappointed that the AMD booth wasn’t handing out Threadripper Pros to everyone that stopped by.
5. Did I mention the people?
Yup, back to the people. I had the opportunity to randomly belt out Metallica lyrics with Kenny Paula and the #metaldevops godfather, Jason Gooley. I ate many a stroopwafel that made the trip from the Netherlands. I watched a Dutch man hit the bell in one of those carnival strength games with the oversized mallet. I made solar battery charging kits with fellow Cisco Champions and the awesome Champs team. I got my selfie with Robb Boyd.
The Bad
1. Timing
I think Cisco Live could easily be three weeks long, and I still wouldn’t do everything I wanted to. There were a lot of sessions that I couldn’t make because they overlapped with other things. I only visited a few vendor booths. I didn’t do any labs, play capture the flag, or do activities in the DevNet zone. I would have loved to have had more time to engage with more people, attend more sessions, talk to different vendors, etc. Trying to fit everything in is a challenge, and as a first-timer, I found that overwhelming in many ways. I also found that I was spending time doing things that weren’t as valuable of a use of time, like the Cisco Live challenge game. I thought it would be cool to win a prize, so I did some of the activities and quizzes to get as many points as possible. Well, I didn’t win, and I probably wasted an hour or two on it. Looking at the leaderboard, I’d bet the people at the top spend a significant amount of time on it, and though the prizes were nice, I don’t think it would have been worth the time. Next time I’ll try to prioritize better what I want to do and limit time spent on anything else.
2. The walking
The walking itself wasn’t really the problem, but the time spent walking was. I stayed at the Luxor, about a 17-minute walk from the hotel lobby to the entrance of the conference center. I bought some stuff at the Cisco Store and wanted to drop it off in my hotel room before I went to my next session. It took 45 minutes to go from the store to my hotel room and back to the next session room. Next time I’ll try to get a room closer to the conference and better plan my trip to the store.
3. The on-site exam
When I registered for Cisco Live, I was really excited to get a free exam. There were a few problems, though. First, there wasn’t an exam I had been preparing for, so I just picked one I thought I’d have a chance to pass with minimal study. Second, when you think about it, an exam might be $400, but when you compare that to the cost of Cisco Live, you’re losing a few hours of the conference to take a test that you could take any time. If I could schedule my exam for a time that didn’t interfere with the conference, it might be a different story, but those spots go fast. Third, trying to get an exam done during the conference just adds extra stress that’s not needed. Next time I don’t plan to bother with the exam. I’ll probably take a look at the schedule, and if there’s a great spot open, I might go for it, but it would be quite low on my priority list.
4. The parties
I’ll admit, I’m not much of the party type. The appreciation event concert was Britany Howard and the Dave Matthews Band. Though both might be great acts, they aren’t my style. The food at the celebration wasn’t great either. The CCIE party (I was a +1, I’m a long way from an IE) wasn’t a big hit for me either. That said, I know there were plenty of people stoked to see DMB, and they had a blast at the parties. They were a great opportunity to hang out with people, and many great conversations were had. Next time I’ll approach the parties as more of a networking event than a concert or similar event. Unless they manage to get a concert lineup with Jonathan Coulton (check out Code Monkey) and Psychostick (check out Blue Screen, which also happens to be one of the best music videos ever made).
And The Tech
Cisco Live is always buzzing with new product launches, announcements, and a massive amount of information. This year was no different. The biggest announcement was the ability to monitor Catalyst switches in the Meraki dashboard and even convert them to running Meraki code so they would be fully Meraki-managed. Plenty of other awesome stuff happened, but I want to focus on the event’s overall experience. I’ll save the tech details for another post.
Aside from product announcements and sessions, there’s also the World of Solutions. Essentially, that’s the show floor of the event. Cisco had huge spaces dedicated to different things like DevNet, Emerging Technologies and Incubation, WebEx, labs, etc. There were also dozens of other vendor booths, some even giving their own sessions on the show floor.
Recommendations for Future Attendees
Wear good shoes. It’s a lot of walking! I think I calculated something like 30+ miles of walking during the week.
Bring a water bottle and stay hydrated. With all the walking, the Vegas heat, and the overall dryness, it’s easy to get dehydrated. Add in air travel and perhaps some alcohol consumption, and that’s a recipe for disaster. There are plenty of water coolers, but sometimes it was challenging to find one that wasn’t empty. Bring a water bottle, fill it when you can, and make sure to drink enough water.
Now that the basic human needs are covered, on to the actual conference recommendations.
Make time to talk to people. Sessions fill fast, making it feel like you need to register for as many as possible. Don’t fall into that trap. Sign up for the sessions you really want to attend, and then use the open time to talk to people. Most sessions are recorded, but the chance to talk to people isn’t.
Don’t be afraid to talk to someone. See your favorite blogger, podcaster, and beard? Go ahead and say “hi” to me. And if I’m not your favorite, that’s fine. Say “hi” to me, and them too. Did you hear someone ask a question in a session, and it sounded like they might be in a similar position to you? Talk to them. Maybe they’ve solved a problem you’re working on. Maybe you have some advice you could give them.
Don’t focus on the parties. Sure, they can be fun, but after an 8+ hour day of talking and tech sessions, if you need some downtime, take it. Maybe doing back-to-back-to-back 16-hour days for a week is something you can do, and if so, go for it. If not, that’s cool. The parties, swag, and all of that are great, but if you risk burning yourself out, make sure to pace yourself.
Swag is great. Prizes are also great. Neither should be the focus of a trip to Cisco Live. The cost of the conference pass, hotel, and airfare far outweigh the value of the swag. There’s always joking about finding the vendors with the best swag, but really, look for the vendors that can help you. Talk to them. Talk to vendors you’ve never heard of. Maybe they have a product that can solve a problem you have, and you didn’t even know it existed. If it ends up not being a good fit, move on. There are plenty of vendors for a participant to talk to and plenty of participants for vendors to talk to, so if there’s no value, then it’s better for both of you to move on.
If you need approval to make the trip, highlight how Cisco Live is a lot more than sales demos and swag. You have the opportunity to meet a lot of people and learn about what they are doing. The odds are pretty good that you can find people that have solved whatever challenge you might be facing or at least people that could provide useful information.
Final Thoughts
If you have the opportunity to go, do it! It was an awesome experience, and I can’t wait for my next chance to attend!
I can’t stress the value of the conversations enough. Speak up in sessions. Ask questions. Track down people if you need to. (Twitter can be a great way to find people), but talk to people. You can get much more focused answers and better insight with direct conversations. Plus you might find a friend.
Have questions? Have Cisco Live tips? Drop them in the comments, or reach out to me on Twitter @Ipswitch
I might have missed or misspelled some important names. If I did, I’m sorry. Let me know, and I’ll update this post. If you want me to add Twitter and/or LinkedIn links for you, send those over, and I’ll be sure to add them.
Ok, there’s only one so far, but I plan to add more where it makes sense.
Scenario 2
Scenario: It’s known that critical applications are dependent on other network services, but there is a concern that the underlying services aren’t able to support the applications.
Technical requirements: DNS has been identified as a critical service that other applications are dependent on. The CML.LAB domain must be monitored for availability and performance.
This scenario provides a few options for tests. An agent-to-server test could be used, but those tests don’t give DNS-specific info. Also, DNS could use UDP, and agent-to-server tests do not support UDP. A DNS Server test would check for DNS server connectivity, and identify if a change was made to a DNS record. That meets the objective of the scenario, so that’s the test we’ll set up.
Create an Enterprise DNS Server test
Log in to ThousandEyes (I presume this skill has been mastered by now)
On the left side, expand the menu, then click on Cloud and Enterprise Agents to expand that list, and then click Test Settings
Click Add New Test.
This will be a DNS Server test. Click DNS for the Layer, and then DNS Server for the Test Type
Enter a name for the test
Under Basic Configuration, in the Domain field enter cml.lab
Leave the record options as default, IN and A
NOTE: This is an internal domain that can’t be resolved by the ThousandEyes cloud. It will show a warning that it is unable to resolve the target. That warning can be ignored.
As before, set the interval to 30 minutes to reduce the test load
In the Agents field, select all the enterprise agents deployed
Enter the lab DNS server IP in the DNS Servers field: 10.133.100.10
Uncheck the Enable box for alerts
When complete it should look like this:
Click Create New Test
This will create the new test, and it will start running right away. Just like the agent-to-agent tests, this test can be disabled to save test units if it’s not being used.
Ok, there’s only one so far, but I plan to add more where it makes sense.
Scenario 1
The objective is to monitor the connection between all agents and the two client sites. Both client sites have agents installed, which means an agent-to-agent test would be the best fit. An agent to server test could be used, but that is dependent on a specific service running, or an ICMP response. Additionally, the agent-to-server test can only initiate from the agent side, while an agent-to-agent test can perform bidirectional monitoring.
Create an Enterprise agent-to-agent test
Log in to ThousandEyes (I presume this skill has been mastered by now)
On the left side, expand the menu, then click on Cloud and Enterprise Agents to expand that list, and then click Test Settings
Click Add New Test.
This will be an agent-to-agent test. For the layer select Network, and then under Test Type select Agent to Agent.
Add a name for the test
Under Basic Configuration there are a few things to set here.
Click in the Target Agent field
On the right side, click Enterprise to filter the list down to only our Enterprise agents
NOTE: the agents listed here are Cloud agents, and those can be used to test public services from locations all over the world
Select the CS1-2 agent
The interval is how often these tests are performed. Since this is a lab we’ll back this off to a 30-minute interval to reduce the number of tests being run.
In the Agents field, we’ll select the source agents. Again, filter based on Enterprise agents, and then select all agents except CS1-2
NOTE: Selecting the North America group (or your local region) will include the CS1-2 agent, and that won’t allow the test to be created because a source and target are the same.
Under Direction, select Both Directions
Leave the Protocol option set to TCP
Check the box to Enable Throughput monitoring, then leave the duration with the default 10s time.
Leave Path Trace Mode unchecked
Uncheck the Enabled box next to Alerts. We’ll cover alerts later on in this series
When everything is completed it should look like this:
Click Create New Test
That will get the first test created. Now we’ll want to create the same test, but use CS2-2 as the target. You could manually create the new test, or duplicate the existing test and make a few changes.
Click the ellipsis (…) to the right of the test, and then in the menu click Duplicate
Correct the test name
Change the Target Agent to CS2-2
In the Agents field uncheck CS2-2 and check CS1-2
NOTE: If you can’t uncheck CS2-2 then click the box next to the region, and that should unselect all agents. Then reselect all agents except CS2-2
When complete it should look like this:
Click Create New Test again
That gets the two tests required for Scenario 1. It should automatically start running the tests. While the tests are running they will consume test units. If you want to conserve test units you can disable the tests from the Test Settings screen. Simply uncheck the Enabled boxes to disable them, and when you want to enable the tests again just check the boxes.
The test results will be reviewed in a later post in this series.
This post will go over the scenarios that will be used for the ThousandEyes lab, as well as the different test types available in ThousandEyes. To see past posts in this series expand the box below.
Part 4.3.3 Scenario 3 – Enterprise and Endpoint HTTP test configuration (Coming soon)
Part 4.3.4 Scenario 4 – Enterprise Page Load test configuration (Coming less soon)
Part 4.3.5 Scenario 5 – Enterprise Transaction test configuration and Endpoint Agent Browser Settings (Coming more less soon)
Part 4.4+ – Details TBD
Scenarios
Here are business use case scenarios that will be the basis for the ThousandEyes lab testing. The scenarios are intentionally vague, but should provide a relatable situation that any network team might encounter. Then, these business cases will be translated into technical requirements that will be used to build out each solution. Keep in mind, that this is to illustrate the business and technical use cases for ThousandEyes. In a real-world situation, there would be multiple facets to these scenarios, but we’re focused on one piece of this solution.
Business Use Cases
Both of the corporate campuses (client site 1 and client site 2) house resources critical to business processes. It is important that these resources are accessible and performance meets the business requirements.
It’s known that critical applications are dependent on other network services, but there is a concern that the underlying services aren’t able to support the applications.
An externally managed web application is used frequently used by employees, and if it were unavailable or slow that would negatively impact the employees’ productivity.
Two internal web applications are used by customer-facing staff, and if these applications are unavailable or poorly performing for any location that would negatively impact the customer experience.
A critical business process relies on a third-party web service. If there are delays in any stage of this process it can cause a significant impact.
Translation into Technical Requirements
Network performance from all enterprise locations should be monitored.
DNS has been identified as a critical service that other applications are dependent on. The CML.LAB domain must be monitored for availability and performance.
Connection performance and availability to these HTTP servers must be monitored. The application vendor should be monitoring the application performance
NOTE: There’s potential value in monitoring application performance both to keep track of SLA metrics, and also to speed the identification of an issue, but for this example, we’ll take the simplest approach.
In addition to monitoring the HTTP connections, the time required to access these applications should be monitored
Multiple web pages need to be monitored, and it needs to happen in a sequence similar to how a user would interact with the application.
Test Types
ThousandEyes has a total of 12 Enterprise test types split across 4 categories.
Routing
BGP
This test looks at BGP peering (the lab environment isn’t peered out to the internet, and setting up private peering is going to be out of scope for the lab)
Network
Agent-to-Server
This creates either a TCP or ICMP connection to the target address and monitors loss, latency, and jitter
Agent-to-Agent
Creates a connection between two ThousandEyes agents, and allows bidirectional TCP or UDP testing, monitoring loss, latency, jitter, and optionally throughput.
DNS
DNS Server
This is pretty straightforward, a DNS record and DNS server are entered, and the test checks for resolution of that DNS record.
DNS Trace
A DNS trace queries top-level DNS servers and then works down through name servers to show the path used to resolve a DNS query the fastest.
DNSSec
With this test, the validity of a DNSSEC entry can be verified
Web
HTTP Server
An HTTP(S) connection is made to a web server, effectively this is like using cURL to check if a connection can be established.
Page Load
Building on the HTTP test, the page load actually loads the HTML and related objects and tracks the time for each step in the process.
Transaction
Continuing to build on the Page Load test, a transaction test uses a Selenium browser and a script to simulate user interaction with a web application.
FTP
Establishes an FTP (or SFTP/FTPS) connection, and attempts to download, upload, or list files.
Voice
SIP Server
This test checks SIP access to a server (by default TCP 5060), and under the advanced options, it can be configured to attempt to register a device with the SIP server.
RTP Stream
This is similar to an agent-to-agent test, but since it tests specifically focuses on RTP it includes MOS and PDV metrics in addition to the loss, latency, and jitter provided by normal agent tests.
The Endpoint tests have two different methods to choose from. The first is a scheduled test, which functions in a similar way to the Enterprise tests. Endpoints can either do agent-to-server network tests or HTTP web tests. The other option, which is unique to Endpoint agents, is the Browser Session test. A Browser Session test uses a browser plugin (installed as part of the Endpoint agent installation) that collects data from the browser based on real-time interactions with web applications.
What’s next?
The next few posts will go over each scenario in detail. It will cover the creation of various tests to meet the requirements outlined in each scenario. After all the tests are created then we’ll look at the results and review how that information is useful.


